【Python】dlibで顔検出
dlibで顔検出を行いました。dlibは機械学習を始め様々な機能が含まれたライブラリです。
検出精度はOpenCVよりも若干良く、横向きの顔もある程度検出できています。

[1] dlibのインストール
dlibインストール前にgcc, CMakeをインストールします。
sudo yum -y install gcc gcc-c++
sudo yum -y install cmake
インストール完了後にdlibをインストールします。インストール完了までに数十分かかりました。
pip3 install dlib --user
[2] ソースコード
公式のExampleを元に作成しました。
dlib/face_detector.py at master · davisking/dlib · GitHub
顔検出だけであれば「dlib」のみインポートで十分ですが、検出領域の表示等で「OpenCV」を使用しています。
import os
import cv2
import dlib

# 顔検出器を取得
detector = dlib.get_frontal_face_detector()

# 読み込むファイルのリスト
filelist = [ 'sample1.jpg',  'sample2.jpg', 'sample3.jpg']

for file in filelist:

    print("------------------------------")
    print("Processing file: {}".format(file))

    # 画像を読み込み(画像はホーム下のimgディレクトリに置く想定)
    imgdir = os.path.join(os.path.expanduser('~'), 'img')
    imgpath = os.path.join(imgdir, file)
    img = dlib.load_rgb_image(imgpath)

    # 顔検出(第二引数はアップサンプリング(拡大)の回数)
    dets = detector(img, 1)
    print("Number of faces detected: {}".format(len(dets)))

    # 検出した範囲を表示
    for i, d in enumerate(dets):
        print("Detection {}: Left: {} Top: {} Right: {} Bottom: {}".format(
            i, d.left(), d.top(), d.right(), d.bottom()))

    # 検出した範囲を短形表示し、別画像として保存
    save_img = cv2.imread(imgpath)

    # 検出した範囲を保存用画像に短形表示
    for d in dets:
        x1, y1, x2, y2 = d.left(), d.top(), d.right(), d.bottom()
        cv2.rectangle(save_img, (x1, y1), (x2, y2), color=(0,0,255), thickness=4)

    # 別名ファイルで保存
    save_file = 'dlib_' + file
    save_imgpath = os.path.join(imgdir, save_file)
    cv2.imwrite(save_imgpath, save_img)
[3] 顔検出の結果
以前に紹介したOpenCVと同じ画像で、顔検出を行いました。
https://predora005.hatenablog.com/entry/2021/08/23/190000predora005.hatenablog.com
[3-1] OpenCVでも上手くいった例
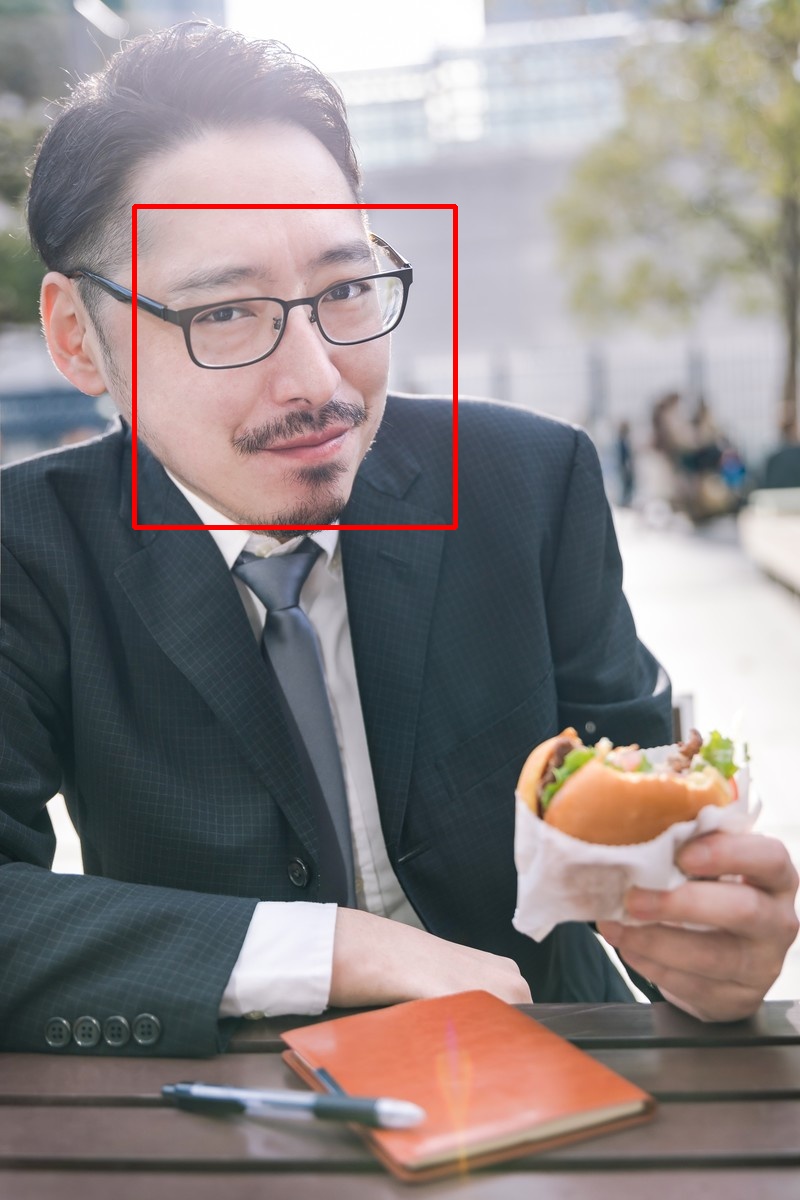
OpenCVと同様に、上手く検出できています。
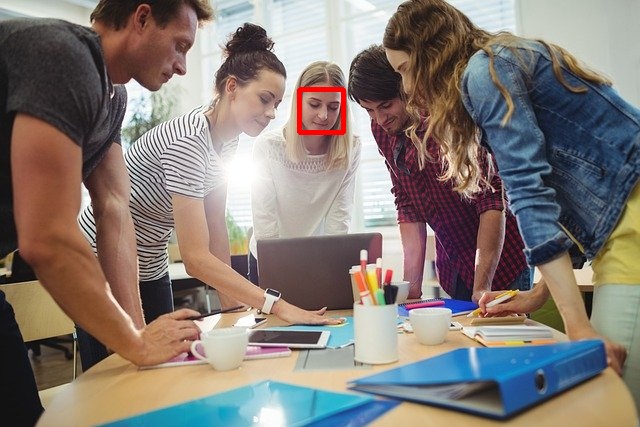
[3-2] OpenCVでは微妙だった例
<Werner HeiberによるPixabayからの画像>
OpenCVでは6人中3人の検出でした。OpenCVに比べると若干よくなっています。
[3-3] OpenCVでは上手くいかなかった例
OpenCVでも1人しか検出できていませんでしたので、OpenCVと同じ結果でした。
[4] 補足とトラブルシューティング
[4-1] ERROR: CMake must be installed to build dlib
gcc, CMakeをインストールせずに、dlibをインストールしようと以下のエラーが発生します。
ERROR: CMake must be installed to build dlib
gcc, CMakeをインストールすれば解決します。
sudo yum -y install gcc gcc-c++
sudo yum -y install cmake
[4-2] 検出スコアの表示
公式のExampleには、顔検出のスコアを表示方法も載っています。
detector.run()を用いることでスコアを表示します。
また、第三引数が閾値のため負値にすることで、検出する領域を意図的に増やしています。
for file in filelist:
    print("------------------------------")
    print("Processing file: {}".format(file))

    # 画像を読み込み
    imgdir = os.path.join(os.path.expanduser('~'), 'img')
    imgpath = os.path.join(imgdir, file)
    img = dlib.load_rgb_image(imgpath)

    # 検出結果のスコアを表示(第三引数は閾値。デフォルトは0.0)
    dets, scores, idx = detector.run(img, 1, -1)
    for i, d in enumerate(dets):
        # idxは、どのサブ検出器にマッチしたか
        print("Detection {}, score: {}, face_type:{}".format(
            d, scores[i], idx[i]))
以下のような結果が出力されます。
------------------------------
Processing file: sample1.jpg
Detection [(134, 206) (455, 527)], score: 0.5904139076373007, face_type:2
Detection [(141, 498) (409, 766)], score: -0.7469268450893916, face_type:3
Detection [(125, 1010) (161, 1046)], score: -0.7642095983401345, face_type:4
Detection [(55, 305) (98, 348)], score: -0.815978666673002, face_type:2
Detection [(573, 870) (609, 906)], score: -0.9177183116772745, face_type:2
Detection [(270, 171) (345, 246)], score: -0.939228042476612, face_type:1
------------------------------
Processing file: sample2.jpg
Detection [(101, 147) (152, 199)], score: 2.2398508228792067, face_type:0
Detection [(210, 49) (262, 101)], score: 2.1349826012916986, face_type:1
Detection [(325, 55) (377, 107)], score: 1.57835485089497, face_type:1
Detection [(446, 153) (498, 205)], score: 1.0782284890480462, face_type:1
Detection [(561, 106) (597, 142)], score: -0.8876646961072061, face_type:2
Detection [(461, 138) (497, 174)], score: -0.9027303159609841, face_type:4
Detection [(255, 295) (344, 385)], score: -0.9184605087140176, face_type:2
Detection [(381, 300) (424, 343)], score: -0.9242407641874437, face_type:0
Detection [(193, 337) (245, 389)], score: -0.9605490173199747, face_type:2
------------------------------
Processing file: sample3.jpg
Detection [(299, 89) (343, 132)], score: 2.0312632118365195, face_type:2
Detection [(596, 285) (648, 337)], score: -0.6916471923688028, face_type:2
Detection [(96, -13) (185, 86)], score: -0.8069736323820238, face_type:0
Detection [(487, 118) (538, 170)], score: -0.8929136693850563, face_type:4
Detection [(497, 20) (605, 128)], score: -0.9076731051139411, face_type:1
Detection [(103, 152) (211, 259)], score: -0.9933327138796852, face_type:4
[4-3] Memory Error
t3.medium(メモリ 1GiB)では足りませんでした。t3.medium(メモリ 4GiB)では足りました。
MemoryError: std::bad_alloc
終わりに
dlibではOpenCVよりも若干ですが、精度の良い顔検出が行えました。
とは言え、横顔の検出精度はまだまだでした。やはりディープラーニング等の機械学習を使った方が、精度が出るのかなという印象でした。
参考文献
画像の出典
- ゆうせい モデルの紹介 - ぱくたそ
- Werner HeiberによるPixabayからの画像
- Sanu A SによるPixabayからの画像